Archive for the ‘English’ Category

IoT Octopus : send data using Blynk

3. November 2020

Blynk is another way of sending and visualising data, from the Octopus, besides using Thingsspeak. To use Blynk, one needs to register with Blynk and download the Blynk app (available on iOS and Android).

Set up a remote sensing device on Blynk

To set up a data transmitting device on Blynk, one needs to do the following:

From the Blynk app :
– Open the Blynk app on your smartphone.
– Click on “new project”.
– Choose “esp8266” for the “choose device” question.
– Wait for the “Auth Token” email that Blynk has sent.

(then) In ArduBlocks :
– In the Setup part of your ArduBlocks sketch, add aWLAN block and a Blynk-Cloud block.
– In the WLAN block : specify the name of your wifi network and the password.
– In the Blynk-Cloud block : the Copy the Auth Token from the Blynk email, and paste it into the API-Key part of the ArduBlocks Blynk-Cloud block.

(more…)

Measure CO2 with a Node MCU microcontroller, if you don’t have a IoT Octopus

2. November 2020

This article is a variation on the tutorial explaining how to make a CO2 measuring device using a Octopus microcontroller, plus CO2 sensors and optional displays.

As one might not always have an Octopus microcontroller at hand, people have asked me how to build a CO2Ampel – CO2 traffic light warning gadget – with a different microcontroller. Thankfully, such a device was recently assembled at Chaos Computer Club Freiburg.

To keep things inexpensive, we’re skipping the NeoPixel LED of the other tutorial, in this tutorial. Thus parts could be obtained for around 55 EUR.
Later, we’ll cover how to connect the measuring device described here, to various displays . Also, those interested in finding further tips and information, can find more information in the Octopus section of this blog.
(This post is for the most part identical with the CO2 Messen mit dem Octopus tutorial, also on this blog.)

Parts

I have provided links to the Mouser Onlineshop and to Tindie. You can also find the parts elsewhere, and my links aren’t affiliate links. 

  • Node MCU (microcontroller, controlling the other elements ), via Amazon or Mouser.
  • CO2 sensor SCD30 – these are available with different interfaces. Eg. With a Grove connector – although often sold out – as well as without. In the case of the CO2 sensors without a grove connector, one needs to solder or otherwise connect it to the microcontroller. Slightly cumbersome but manageable. (Digikey from 53 EUR, RS Online from 72 EUR, Mouser around 50 EUR – at time of writing these were sold out, but new ones are orderd)
  • LCD panel – To display the data from the CO2 sensor. There are several variants, also with Grove connectors. From 6 EUR. from Mouser.
  • A power source – Likely you already have one – a USB charger. Just make sure you  have  a Micro-USB cable. Powerbanks are an alternative, especially if you want to carry the device around. 
  • Grove connector cable – 2.5 EUR by Mouser.
  • I2C Hub – a hub connecting several Grove connector cables. Grove connector cable – 2.5 EUR by Mouser.
  • A case – There are many ideas around. From Ikea picture frames, to Bird houses.
  • A Data ready USB cable – You probably have one at home, but may have to try several USB cables before you find one that can transmit data as well as power. Please note, quite often the USB cables one gets with various bits of electronics can only carry power. So it makes sense to try different USB cables if USB cable one doesn’t work.

Programming

To program Arduino code with visual programming (Ardu)blocks, we need to modify the Ardunio IDE code editor a bit. (For those that prefer text-code, you’ll find the produced Ardublocks code, in text form, at the end of this tutorial).

The easiest way to get going is to use a Windows PC and install the software following the instructions (including download links ) from the Umwelcampus Birkenfeld website. Instructions for MacOS and Raspberry PI can also be found, via the website’s overview page. I’ve also made some tutorials for Mac OS here on my blog. There is a (German language) Tutorial for Raspberry Pi, too.

Windows: download the zip file with the ‘blocky’ Arduino IDE and then install the relevant hardware driver software. Install the Arduino into a very short File tree, et. C:/iotw. You may also have to take care if you have another Arduino Version already installed. Pay attention which do you start. Start by double clicking on the „IOTWerkstatt.bat“ file.

Raspberry Pi: Setup RaspberryPi Os (Raspbibian) for your Pi and then download the modified Arduino IDE from here.

Mac OS: this is a bit more complicated compared to Windows, but accomplishable using these instructions (in German, again), or the ones below. Here too, you need to install the relevant hardware driver software, and download the special Arduino IDE. This is done as follows:

  1. Download the Driver.
  2. Download and install the Arduino IDE.
  3. Following the installation of the Arduino IDE, right-click on the Arduino IDE icon, and select “Show package content” from the menu. This shows the files that make up the Arduino IDE.
  4. Open the “Contents” folder of the just-opened Aruduino package.
  1. Open the downloaded IoTW.zip file.
  2. Drag the “Portable” folder (of the expanded IoTW.zip file ) into the “Java” folder of the expanded Arduino IDE files.
  1. Now open the Arduino IDE.
  2. Open the “Tools” menu and go to Port submenu, and select “Dev/cu.SLAB_USBtoUART” option, to select the right port.
  3. Open the “Tools” menu, as before, and now open the “Board” submenu, and select the “Generic ESP8266 Module”, as our board.

Cabling

The ESP9266 is cheap and can be used as the microcontroller for the CO2 Traffic lights.

Connect yellow on the D1, white on the D2, black on the GND, and red on the 3V. The cables connect with the Node MCU as shown in the table below. Now we need to solder them into place.

Node MCU pinI2C / Grove Cable
3.3 Vred
GNDblack
D1yellow / SCL
D2white / SDA

Here and now is a good time to solder the (Grove) cables to the Node MCU.
Then we can do fun things like connect a Grove LCD and a SCD30 CO2 sensor to the Node NCU, via a I2C hub. As the grove Cables have preset colours, this should be simple.

(more…)

Send data from the Octopus using Thingsspeak

28. Oktober 2020

Now it’s time to have a look at sending the data the Octopus microcontroller has measured, through its own sensors or attached ones, over the net.
For this tutorial, we’ll use the Octopus microcontroller’s on-board Bosch BME680 sensor.

Note for Mac and Pi users: Unfortunately, there’s an incompatibility with the Mac OS compiler and the Bosch BME680 BEC driver. Things fail in the compilation stage. A workaround is to read a single BME680 value at a time, or use a different BME680 driver, without BSEC. Sometimes it works, just try or use a windows system

The BME680 BSEC is a great sensor, which can measure:

  • Air pressure
  • Relative humidity ( rH )
  • Temperature
  • VOC – Volatile Organic Compounds.
  • IAQ – Air Quality Index (AQI). AQI values between 0-100 means the air is relatively ok. AQI values between 100 and 200 means it’s a good idea to ventilate regularly. Values above 200 indicate one needs to ventilate urgently.

The AQI value is calculated based on several factors. Thankfully we don’t need to worry about performing the calculations oursleves. The BME680 BSEC library does the complex calculations, and simply delivers us an AQI number. Simply select things relevan in the BSEC Block (the red arrow) and get the AQI value.


Thingsspeak Block with Bosch BME680 SEC in ArduBlocks


Sending measured data with Thingsspeak

Data can be sent from the Octopus, using the free Thingsspeak open source project and service. One can use the Thingsspeak website for free, for personal or educational purposes. Alternatively, one could also install the Thingsspeak software on a Raspberry PI, and use it as a Thingsspeak data receiving server. Using a Raspberry PI with Thingsspeak provides a low cost and low power solution.

(more…)

Build your own bike tracker with TTN

24. Juni 2018

TTN_GPS_Bike_tracker.001

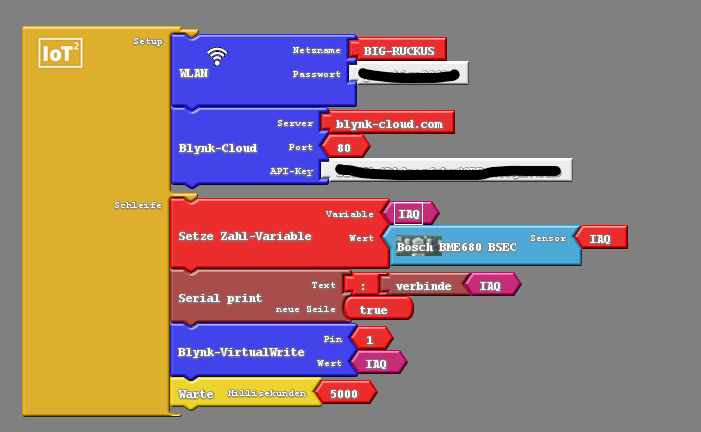
How it works, in a simple overview.

Keeping track of a moving and easily stolen object, like a bikecylcle can be an challenge. Of course you can try to remember where you parked your bike and then go back to the place. But what if it is stolen? It would be helpful to attach a little device to your bike that sends its position to a webservice and then on to your mobile phone.

Currently most systemsmost systems either log the data on file or use a GSM sim card and data tarif to send the location information to a server. Usually such a sim card has a monthly bill.

But what if we use the Long Range Wireless Network provided in Freiburg by The Things Network Freiburg Community. The network already covers large parts of town and is expanding. And how can we use this application without programming. I can’t programm and so writing code and maybe a server application is out of the question for me.

IMG_1794

See it on your telegramm channel!

But there are several good webservices that can helpd: IFTTT with a telegram channel integration.

What do we need?

  • Zane Systems: ztube, which was supplied kindly by Zoltan
  • zTracker Configuration Tool
  • a TTN Account, Application and acess to the console
  • decoder function
  • webhook
  • an IFTT Applet that pushes the data to a telegramm channel
  • telegramm account

For hardware we used the zTube from Zane Systems, its currently about 70 € but I had bought a previous version of the tracker before and so he send me a zTube and zTrack Midi by Express TNT, which we got on Friday at the same day the hackaton started.

How to set up

When I got the zTube I went to the TTN Console and put in the data. Meaning I set up a new application, klicked on „add device“. You can add the DEVICE EUI which is printed on the label of the zTube and set it up from there. As a configuration I set it to „ABP“ not OTA and disabled Frame Counter Checks. The rest of the configuration I left as it was. I’m not even sure if I had to disable frame counters.

You can configure both with the zTrack Configuration Tool. As a configuration we entered the following data:

image (1)image (2)Then in the console you have to enter a decoder function. As a base we used function developed by TTN Berlin and provided here: Or you use what we did (download and copy paste to your application).

console

Sometimes the zTube does not find a gps fix, then this data is empty. If it does it looks like this in the function:

Untitled 2

I’m not yet sure what is the optimal configuration for the zTube, as I don’t want to overuse the bandwith but also get good tracking results.

Now for the IFTT integration: Install IFTT on the phone. It seems to be much easier to do all the stuff on the phone and not on the website. Get an acoount and so on. Then go to the browser and google „IFTT webhooks“, then open the webhooks page in the iftt app. press on the „Documentation“: is show your key. Copy the key into notes.

IMG_1813

Click on documentation.

IMG_1815 copy

You will then be lead to a website again with your key. Copy the key to notes or send it to you by email. You will need it to enter later.

(more…)

Lord Mayor of Freiburg Dieter Salomon becomes patron of the Freiburg The Things Network Community

28. März 2018

Übergabe_Gateway_2

Turning it on. From the left: Lea Treicks (Badenova), Dieter Salomon (Mayor of Freiburg), Sebastian Müller (TTN Community Freiburg), Thorsten Radensleben (CEO of Badenova).

At an event today at Freiburg’s municipal owned energy company, the Lord Mayor of Freiburg Dieter Salomon and the CEO of bade nova Thorsten Radelsleben handed over Gateways for the Freiburg The Things Network Community.

At the same even the Lord Mayor declared that he wants to become the patron of the The Freiburg The Things Network Community.

“With my patronage, I support the new The Things Network Community Freiburg and promote cooperation between this community, the city administration and the society. (…) The Things Network Community Freiburg offers citizens the ability to actively participate in the digital transformation of our city with a cost-effective and open approach. Self-interest, the will to implement solutions and a sense of responsibility towards the community provide a fertile ground for creativity in favour of a solution-oriented urban development.”

The Things Network Community Freiburg is very proud of the material support and the recognition given through this patronage.

Currently there are ten active Gateways in the City of Freiburg. A variety of institutions and individuals have already put ups their Gateways and several institutions have announced they will participate. Apart from individuals, the Haufe Lexware publishing house, Fraunhofer Institut for Physical Measurement Techniques, FreiLAB and Atec Software have put up Gateways, and several other gateways have been announced. The Chamber of Industry and Commerce, the Coworking Space at Martinstor and the Chaos Computer Club want to set up a Gateways, too.

Together with the infrastructure provided by our local energy and water company we will become one of the top cities with TTN coverage in Germany and second only to the leading communities in Amsterdam and Zürich.

The TTN Freiburg Community regularly organises workshops, so that the network can be used competently and continues to grow.

„For us, Smart City does not just mean putting on great technology: we want to empower citizens to participate,“ Müller explained. (more…)